

What we mean by locomotion puppeteer is that the user doesn’t move themselves around the space but instead moves a character around the space. This is a common 3rd person game mechanic for VR. In many cases this can alleviate the VR sickness associated with moving around in VR space but still give a cool dimensional experience. This mechanic can also be paired with direct control and teleportation to allow multiple views of the scene or to allow the user to reorient their view as needed.
VR Sickness and Puppeteering
There are still things to think about when using this mechanic and VR Sickness.
Orientation – Changing the users up and down orientation can cause one of the more jarring disconnects between the body and the eyes. When deciding how to orient the player to the scene so they can view the action it is important to be careful if you are going to tilt them down over the scene. Allowing the user to look down is more natural. It is also tiring and sometimes VR sickness inducing to look down for longer periods of time. Limiting the down angle view required can help alleviate this issue.
Camera SetUp for VR
The default camera in Alice is set up to have a slight downward angle. When you first start your VR project or are translating an existing world to VR be sure to use the following to straighten out the Camera view to avoid the disorienting feeling of being slightly tipped forward.
1. Go to the Scene Editor
2. Select the Camera
3. Select One Shots
4. Select OrientToUpright
Move Using the Joystick or D-Pad Quick Start
The Alice arrow key inputs map to the VR controller Joystick or d-pad. The fastest way to set up direct controls of a character is to implement the keyboard event addObjectMoverFor and attach it to the object/character you would like to puppeteer.

This built in control will give the user the following controls:
Up Joystick – Move Forward
Down Joystick – Move Backward
Right Joystick – Turn Right
Left Joystick – Turn Left
While we do not expose the parameters on the defaultObjectMove for it behaves as if the following parameters have been set:
Held Key Policy: Fire Multiple – This means you can hold the joystick in the direction and it will continue to trigger the movement
Multiple Event Policy: Combine – This means you can hold the joystick in a diagonal direction and the forward/backward and turn will both be processed at the same time.
The defaultObjectMoveFor solution also adds a parameter that constrains all movements to the X,Z or ground plane. Even if you do not follow the VR set up and reorient the camera to upright (or make sure an object is oriented to upright) the movements will keep you level with the ground plane.
To set this locomotion up do the following:
1. Navigate to initialize eventListener tab
2. Select Add Event Listener
3. Select Key Press Event
4. Select addObjectMoveFor
5. Select the character or object to be controlled
You can view an example of this construction by loading the vrLocomotionPuppeteerDefault.a3p
Move Using the Joystick or D-Pad Flexible
The built in addObjectMoveFor works great for a lot of implementations but in some cases you may want more control over the direction or speed of the moves. For more flexibility you can construct your own arrow keypress events to connect them with the joystick or d-pad inputs.
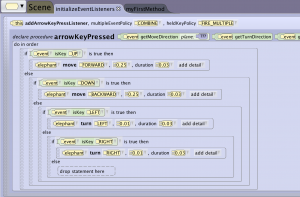
Option A:
In this example we have set the following parameters and values:
HeldKeyPolicy = Fire_Multiple: We want the movement to continue when you hold the joystick in a direction.
MultipleEventPolicy = Ignore: We want them to continue but not to stack causing an acceleration. Try this both ways to see the difference.
AnimationStyle = Begin_And_End_Abruptly: The default Begin_And_End_Gently causes each separate move to speed up and slow down. To create a smooth constant speed we want each separate move to have a consistent speed. Try this both ways to observe the difference (It may be less obvious with shorter durations and distances).
Distance/Turn Amount: Changing the distance will impact the speed of the directional movement. We have set 1 meter for forward and backward which is fairly quick. The larger the amount of the turn the faster the turn input will spin the object. We have set it as .01 for the turn because a large number here will cause a jarring spinning motion. Play with these values to see the effect.
Duration: We have chosen a shorter duration so that when you release the joystick the movement will end more quickly and feel more direct. Play with this value to see how it affects the movement after the input is released.
We separated these events into two events grouping them by events that can’t be simultaneously triggered (you can’t push the joystick forward and backward at the same time). We did this because the ignore parameter will only allow one move or turn to be processed at a time. Try putting all of them in the same event to see what happens.
You can view an example of this construction by loading the vrLocomotionPuppeteerKeypressOptionA.a3p
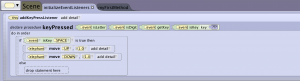
Option B:
In the above example we have put all of the directions into one event. To make this work we have set the following parameters and values:
MultipleEventPolicy = Combine: This allows this event to process multiple conditions at the same time. In this case it will process both a forward or back and a left or right at the same time.
Duration = .03: This duration was chosen because Alice will process up to 30 input per second. By choosing this duration we are ensuring that two moves/turns in the same direction will not be processed at the same time and be combined into a larger move. Try increasing this number to see what happens when multiple move/turn procedures of the same input begin to process at the same time.
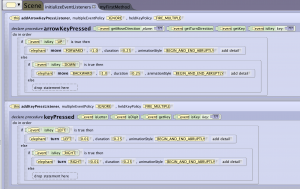
To create your own key event you will:
1. Navigate to initialize eventListener tab
2. Select Add Event Listener
3. Select Key Press Event
4. Select addArrowKeyPressEvent
5. Add an if/Else conditional block into the event
6. Replace the true/false default with an event isKey ??? function from the event
7. Select which key you want to add an outcome for remembering the mapping to the joystick and d-pad
8. Add the movement or turn you want associated with the input
9. Continue adding till you have all of the inputs you want and try out the different approaches shown above
When creating your own custom keypress to move, turn or roll an object the move, turn or roll will be relative to the object orientation not the ground plane. Be sure the orientation of your character is set to upright similar to the camera if you want it to move and turn relative to the ground plane
You can view an example of this construction by loading the vrLocomotionPuppeteerKeypressOptionB.a3p
Tuning the Movement
Following this same construction pattern you can now pick and choose the directions you want to apply to each direction on the joystick or d-pad. This gives you all of the options for moves, turns and rolls. To make adjustments to the speed the user will move and turn through the world you can adjust the distance or rotation values and the duration. It is a good idea to keep the duration low to avoid latency of movements continuing after the user has released the input. Remember the points made above related motion sickness and movement in VR. Set your speeds to be slower than normal, regular movement rate, and fast and see how they make you feel. Be very careful when using turn not create extreme spin effects like a rida at a carnival unless your user knows what they are in for.
You can use the combine option shown in Option B to create smooth acceleration and deceleration. Try starting with the duration of the procedure at .033 and slowly increase the duration of the move procedure and observe the stacking of the movements and the slow unstacking after you release the key.
Adding Other Inputs
You can add other keypresses to extend the puppeteering such as adding a jump or other movement by programming more keypresses to the world. A good example is adding a jump to the character. Here is a simple example of implementing a jump to the world:
1. Navigate to initialize eventListener tab
2. Select Add Event Listener
3. Select Key Press Event
4. Select addKeyPressEvent
5. Add an if/Else conditional block into the event
6. Replace the true/false default with an event isKey ??? function from the event
7. Select which key you want to add for the jump. Use the A,B,X, or Y to map it to one of the controller buttons.
8. Add the movement to the if block such as a move up and then move down.
9. Test
You can view an example of this construction by loading the vrLocomotionPuppeteerAdditionalKeypress.a3p
Vehicling the Camera to the Character
A common mechanic in desktop games and experiences is the 3rd person camera that follows the character around. This can be very disorienting in VR. This awkwardness is why you see the use of teleports, scene changes or more intentional camera changes more often in VR experiences. The third person camera also breaks the narrative of me being present in VR. That being said it has been done in some very cool experiences in VR. You can definitely give it a try and see how it makes you feel. Experiment with the distance from the character you are following and the orientation of the camera relative to the character.
1. Place your camera relative the character you have set up moves for
2. In the scene editor set the camera vehicle to the character
3. Test
To see an example of this setup view the demo: vrLocomotionPuppeteerThirdPerson.a3p